Putting the KN-Q7A thru it’s paces

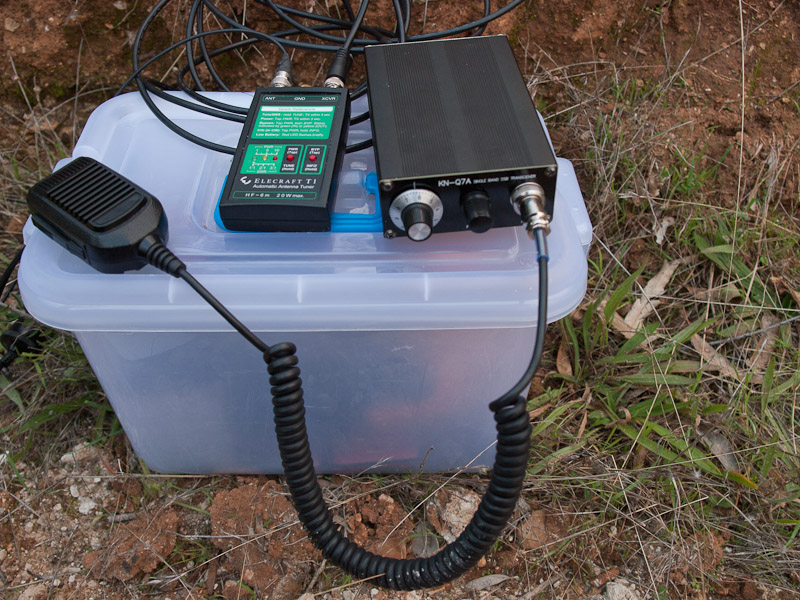
Last night, had the opportunity to sit down with some test gear and run the KN-Q7A 40M txcvr thru it ‘s paces.   At the moment, the only modification from stock that I have done is to replace T3 toroid in the output stage.

Having access to a 2-tone generator, calibrated signal source and spectrum analyzer, power meter and dummy load was what we used for the testing.

Silly me, did not get any screen-shots of the output.

Basically, we did a 2-tone test, minimal discernible signal, IF bandwidth, spurious output.

2-tone test

Adjusted the level of the tones until the output power peaked – and it peaked right at the 13W mark.  We left it key-down into a dummy load for around 10-15 minutes – which is far more brutal than any real-world use will ever be!  The Final did of course warm up a bit- was certainly warm but not so hot that you could not touch it with your finger.  The whole case (heatsink) did increase in temperature, showing that the design is quite adequate.

We took a look and found that the output was not that clean!  It took a little bit of trimming of the BFO to improve things, and once sorted out, it looked like the IMD at it’s worst – which was when we dropped the input level so that the output power was around the 10W mark.  It was at about -23db.  While not brilliant, nowhere near as bad as what others have reported.

The odd thing was that there is a very “sweet spot” when it was driven pretty hard and at full output power, we saw the IMD drop right down to around -30db!  Yes, at full output power, the signal was a lot cleaner than at all lower levels.  The Worst case was in fact -mid-power – right in the area where normal voice would be.

This pretty much confirms that I need to go ahead and build a compressor before feeding the audio into the 602 Mixer – a mod I had actually planned on doing.

Minimum discernible signal

We used a reference level signal generator and set it to about 7.090, tuned the rx to it. Then it was simply a case  of tweaking the RX until the tone was mid-range in the bandpass filter then lowering the level. Surprisingly good is what I would say here!  a CW tone was easily heard way down at around -124dbm!  beyond here it was noticeable for another 2db, but all gone and nothing heard at all at -127dbm.

Lets look at -124dbm – that is 0.14uV and that makes it a pretty hot RX!  My “gut feel”  that it was a good rx was totally confirmed.

But let’s not get ahead of ourselves – this was a single-tone test and listening by ear, so lets be a bit realistic and add 10db to that single tone figure  and at -116dbm = 0.35uV

IF bandwidth

Pumping in a CW signal at 7.095, at -90dbm level then tuned the RX to it.  Then by listening to the output, the signal was varied up/down in 100hz steps.  It was dead easy to show that the B/W if the IF Xtal filter is as I had already determined is 1.8khz wide, with a very clean, response with a slight roll-off at the 100hz mark on each side.  I wish that my other commercial gear was as good to tell the truth!

-90db signal level gave us 35db over the minimal level, so that all we can say is that at 1.8khz, the filter is better than 35db.  Didn’t think to try this at a higher level to determine how steep and sharp the filter is, but in the real world it is certainly good!

Spurious output

Well this is where it got a little interesting – and yes there were a few bumps along the way.

First off, the 2nd, 3rd, 4th and 5th order harmonic outputs.

2nd was at about -63db, 3rd was at -68db, 4th was at -72db and 5th was at -80db.  Could not determine if there was any higher orders as they were in the noise floor.  Given that on 40M the 2nd, 3rd and 4th fall into other Amateur bands, this is not going to cause any interference – especially when you look at the levels!  -63db with a 13W output is way down at 7 micro watts!

Now the VFO/BFO products. this is where things were not quite as clean!  There were 3 obvious products – 1.3Meg, 5.8Meg and 8.4Meg. If you look at the IF frequency then these all make sense!

It is output + and – the IF difference – 8.467 – 7.1 = 1.3Meg (approx), and then 7.1 + and – the 1.3Meg

If = 8.467Mhz, VFO = 15.570Mhz (+2khz, – 35khz)

The 2 that were +- 1.3Meg from the signal were around the -45db mark and the one at 1.3Meg was down a little more – at about -48db.  Rather than a simple low-pass filter on the output, a better band-pass filter that is reasonably tight would be needed to knock these unwanted products down a bit more.

Measured v’s Spec’s

Finally, lets pull the “specs” and compare them to what we actually measured!

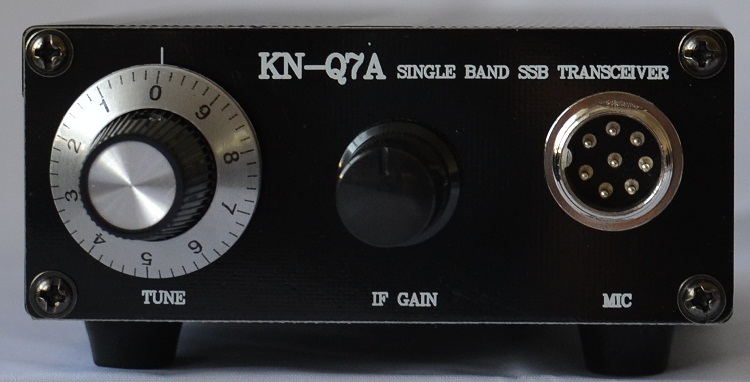
My kit was the Mar 2014 Rev D PCB V2.2 with the IRF530 FET as the final.

  • RF output: about 10 W PEP @ 13.8 V
  • Spur suppression: better than -43 dBc
  • Sensitivity: better than 0.5 μV at 10 dB SNR
  • IF bandwidth: about 2.0 kHz

What we measured

  • RF output:  13W PEP @ 13.8 V
  • Spur emission: -45 dBc
  • Sensitivity: 0.35 μV at 10 dB SNR
  • IF bandwidth: 1.8 kHz

Now, in all of this testing, the only adjustment that was made was the BFO trimmer, all other tuning was left as it was from my initial tuning.  Truth be known, a little bit of tweaking could have possibly seen some further improvements, but that was not the point – it was to look at what was going on by doing nothing more than following the tuning steps – which is exactly what anyone building the kit would have done.

Lets face it, all in all, for a transceiver that costs only a bit over $100, this is really quite impressive!

Yes, doing these measurements  and now having something to go on shows me that this design if advanced just a little more could move it from pretty good to excellent!

From a pure usability perspective, adding a “tune button”  – resistor to gnd + bypass cap on the NE602 to un-balance it and give around 2W out would be nicer than having to do the whole whistle/tune thingy!

Adding the compressor stage and and AGC to improve both TX and RX experience and finally, a little more output filtering would take this from a good to a great transceiver.

Now, I am going to get on and build the DDS to give me a tad more band coverage, built an audio compressor stage, another Audio out stage with AGC myself over the coming weeks, that is of course, between getting lots of use out of this little rig!

Mt Bryan – VK5/SE-001

An early morning start was needed to get us up to Mt Bryan – the highest summit in the Mt Lofty Ranges.   This is a summit that is only available during the winter month’s as the Heysen trail, which leads up to the summit is closed during the summer fire-ban season from 15 November – 30 April

We planned to be on the summit at 23:00UTC, so we could take advantage of the Day Roll-Over and hopefully secure a few more contacts.

Weather was looking up, it had been a pretty clear night, but in the 5 minutes we were putting the gear into the car low clouds started rolling in from the South – not a great sign.

After a 2 hour drive we arrived at Mt Bryan and then headed the 17km up Mt Bryan Road East, arriving at the Heysen trail for the hike to the summit just after 7am to be greeted my a magnificent sunrise!

Sunrise My BryanIt was a little ominous to look up and not be able to see the summit as it was covered in clouds.

mt bryanSomewhere up in the clouds is the summit that we were on the way to.

mt bryanYes, somewhere in the cloud there is a summit.

mt bryanJust below the cloud-line on the way to the summit.

We made it up to the top and signed the visitors book, then found somewhere out of the wind to set up ,and were on air on 40m at about 23:15

top of mt bryanThere was a summit in the clouds!

Yes, the hike up the hill is a comfortable 1hr 15 minutes from the road, with about a 4kg pack, radio, battery, drink, antenna, squid pole and chair.

We used the fence post just down between the peak with the old trig point and the memorial cairn on it to attach the squid pole – as it was the only point in the activation zone that was a little bit out of the wind!


on the summitWhen it is cold and damp, I was very glad to have brought a chair and not been sitting on the ground!

on the summit

We were in the cloud and managed 25 contacts before the day rolled over.  Just before day roll-over a very fine rain started that was getting right thru everything.

A further 14 contacts were made before we pulled the plug at just after 00:15 and packed up.

A few more photos on the summit before we made our way back down the trail – where the wind had picked up and the rain was just blasting thru!

stone chair

The stone chair

mt bryan trig pointThe remains of the original trig point

Back at the car in just under an hour from leaving the summit, we headed back and stopped by the Burra Bakery for a pie on the way home.

13/06/14 worked the following stations:

VK5LY, VK5NIG, VK5PAS, VK5AKH/m, VK2YW, VK3PF/q, VK2IO, VK2DAG, VK1MA, VK6MB, VK3DET, VK5WG, VK1DI, VK3AMB, VK2KTT, VK3FMOL, VK5FIVE, VK3FQSO, VK5FMIC, VK5ZM/p, VK2TWR, VK3BYD, VK5CZ, VK5QI, VK5FGRY/p

And after the day rolled over, worked the following on the 14/06/14

VK6MB, VK5FGRY/p, VK1MA, VK2TWR, VK2IO, VK5LY, VK5WG, VK3PF/q, VK3WE/q, VK3AMB, VK5NIG, VK3FQSO, VK5PAS, VK2LAX

A big thanks for everyone that called in making the hike to the summit worth the effort!

Mt Gawler

SOTA Summit VK5/SE-013

Went out and did my first SOTA activation this afternoon.  It was a nice day and I had a little bit of time.  This summit is very accessible and only a 15 minute drive from home.  On the way home we posted an alert to sotawatch in the hope we would have a successful activation.

We found a suitable spot to do the activation on the side of the road, and turned around, then jumped out and walked into the zone with my kit.

Put up the 40M dipole and tuned to 7.095 and put out a CQ call at 06:23UTC.

20140524_163921
CQ 40 this is VK5FO…

You might note that in the photo, I am holding my headphones away from my ear – a necessity as i do not have any ALC on the RX and don’t need a strong station blasting my ears out!

Within a minute on the 2nd call, VK5NIG replied to my call and let me know that he had been out and activated this site earlier in the day!  (next time, look at the alerts before heading out…)

The responses to my calls came thick and fast and over the next hour. I had 33 contacts in the log for the activation.

On the way home, I got an e-mail that had a short video attached from vk5fgry – from his portable location in Morialta CP (about 16km away) he recorded my last logged contact for the activation with VK3FB/p

MtGawler20140524

By this time a few of my earlier contacts let me know that my signal was getting pretty bad – like my battery was getting flat, so I packed up and called it an afternoon.

just under an hour and 33 logged, a pretty successful 1st SOTA activation.

Calls logged:  VK5NIG, VK3UBY, VK3YDN, VK2UH, VK1MA, VK3XL, VK3FQSO, VK5FGRY/P, VK4FR/P5, VK5WG, VK3FPSR, VK3FOWL, VK3AFW, VK5NQP, VK2YK, VK5ZAR, VK2MT/P, VK2KTT, VK3AZZ, VK3AMB, VK3ARR, VK3AXH, VK3FAJH, VK1NAM, VK2QR, VK5KPR, VK2NNN, VK1DI, VK3FSWB, VK8GM, VK2EXA, VK3NCR/2, VK3FP/P

There are a few other easily accessible summits that I will get out and activate in the coming weeks.


Montacute CP

This afternoon, I packed up the new KN-Q7A Transceiver, the T1 Tuner, Squid Pole, 40M dipole, and a Battery and headed out to Montacute CP.

MontacuteCP

We drove to the end of the road, and walked into the Park along a section of the Heyson Trail for about 15 minutes up to near the top of the hill.

We set up just up the trail, near the top/right where it bends around near the crest of the hill.  Within a few minutes, I was sitting on the side of the track and calling on 40M.

Now, today was a special day as I was operating my new KN-Q7A Transceiver for the first time after a false start on Saturday, where I went out and found that The tuning was a little off!

I started calling and within a few minutes had my first contact in the log – and by all accounts, from everyone who answered I was doing pretty good from the approx 12 Watts I was transmitting.  Yes, that is my tuning “cheat sheet” – as the Transceiver only has a VXO.  Before heading out, we set up an SDR and plotted the frequencies and made a note of the dial readings for each 5khz step and then the maximum and minimum.   I only have 7072 to 7102 tuning range and it will do for the next few weeks until I build the DDS kit and mod it!

My “Portable Station” – we found a nice little plastic box that fits everything needed – radio, tuner, battery, antenna, patch cables and a logbook, just the 1 box and the squid pole makes going portable very lightweight.  For the astute, you will note, no internal speaker (wasting valuable space that will be used for other mods) instead, it is a speaker/mic which is quite reasonable.

Thanks to everyone who called and a bigger thanks to a few others who came down into my tuning range to respond to my call!

This afternoon, we worked the following VK’s –  5ZAR, 3PF, 3ANL, 3FPY/5, 5WG, 5FMID, 3AMB, 5PAS/p*, 5LY, 5FGMH, 5KGP, 5BB, 5CZ, 5FGRY/p*

There were a few new calls in the log and a few now familiar ones as well!

VK5PAS was portable operating from Mt George CP, and VK5FGRY was  also portable in Morialta CP, for 2 Park to Park contacts in the logs.

Lets face it, it is not just about playing Radio that makes it worthwhile getting out into the Parks because as we were packing up, the sun was just setting and it was quite spectacular!

With a sunset and view like this, why wouldn’t you want to be out there!

We were also rewarded with lots of birds and a couple of Kangaroo’s  crossing the track on our way back down.

Yep, if you look carefully, you will see that I took one of these sunset  Images and added it to my blog as the banner image.

… and then… Since Gary (VK5FGRY) was at Morialta CP, and literally only a 15 minute drive away, we dropped in there on the way home – why only do 1 park when you can do 2!

Gary was set up using his new 10M Pole from DX-wire and it is slightly larger on the top section than a standard squid pole making the whole 10M useable – certainly a good looking pole that is worthy of adding to the portable kit.  I borrowed Gary’s dipole and worked a couple more interesting stations.

VK5NIG was portable on Summit SE-013 – Mount Gawler and then VK3NBI/p and he was working from the Cape Ottway Lighthouse – getting everything ready for the Lighthouse Weekend in August.

For anyone looking for a nice lightweight radio, from the reports I had back today, that this one should be a real contender for a lightweight rig to put in a pack and get out there, certainly a lot easier than taking the IC-706 which we used for the first few activations, and in it’s current state, very battery-friendly on receive (only 40ma).

With today’s activation(s) I have now done 5 unique CP’s and probably now also logged enough as a hunter to qualify for a bronze hunter, not bad for a month!

Look forward to logging you from another park soon.

40M SSB Transceiver kit

A few days ago my KN-Q7A 40M SSB txcvr kit by crkits arrived.

knq7a

When it turned up, I had to take a 2nd look – this thing is tiny – somehow I thought it was going to be bigger.

I have been putting it all together and at the moment the RX is finished and working, just the Output (Power Amp) Stage and physically putting it all together to go.

I spent a few hours over 2 evening and the assembly instructions are both logical and very good!  It is not a kit for the first time builder, but on the same token, with a few kits under your belt it would be an easy one to tackle.

Already, I am reasonably impressed with the receiver.  it has a nice, tight bandwidth –  350-2100hz, and about -45db at 2500hz.  Sensitivity-wise, I am only guessing, but based on my Vertical antenna and dipole, it is quite comparable to both the Icom 706 and the TS-2000 (with the TS 2000 set to 300hz/2200hz filter bandwidth).   I usually like to use 200/2400 on the filter so this receiver is very close.

Initially I am building it as-is and once it is all up and working I’ll then go and do a few mods to improve it in a couple of areas.

I went with the 7080-7100 VXO version and a quick check and It tunes from around 7077 – 7102, just perfect to cover 7090 and 7100 (and a little more as well).  Already, I have found that tuning is very touchy, but that will be solved when I modify it and add a DDS – yep I have the ILER DDS Kit  which will  replace the VXO – it will give me decent stability and be much easier to tune.

ILER-DDS

As this is a kit, it can be built to fit inside the case of the Transceiver, with the display in the top.

There are some nice suggestions over at David – VK3IL‘s blog for some mods that he has done and a bit of discussion relating to other possible mods as well.

The only other mods I am looking at is to add some audio processing before the Mixer – just a tad of compression to keep the average output power up,  probably looking at replacing or adding an extra audio stage  with some ALC and also to replace the toroid in the output transformer as per David’s suggestion.

Hopefully I’ll have it on air in a few days time, then start on all the mods.